Sunday, 16 November 2014
Tuesday, 4 November 2014
Custom L.E.D Unit - Firefly
The reason I did this custom L.E.D unit because i failed making a standard unit xDD
So yeah , to be able to use this custom unit , there is alot of conditions xD
SO in the picture above you can see that the yellow L.E.D unit isn't that bright and it isn't that satisfying to me .... then i came to thinking to use a brighter L.e.D bulb and custom my own L,E,D unit ~
Cost saving and simple.
This LED I'm making is based to the firefly (an insect with a light up buttock xD )
Simply made from LED bulb , Battery , thread and a small piece of pla-plate.
in this case , I made mine using a blue L.E.D i obtained from a old toy , and 1 x CR1220 flat battery. (you can use different size items as you prefer)
The pla-plate acts as a push and pull mechanisms that enable and disable the circuit... when pushed in , it will disconnect the LED leg from the battery that disconnects the circuit , , and when you pull it , the circuit will be connected as the LED leg touches the battery ....
The thread will maintain the position of the LED legs and the battery~
Well , this isn't a pro way to make a L.E.D unit , but you can make this using items you can get from stores at low price ~ PLEASE be very patience when setting the LeD unit xD
circuit test >>>
heheh so its working , then its ready to be set up in my Gunpla xD
Fabulous ~ xD bright enough to light up the top camera :D
Comparing , the original L.E.D unit and the Firefly unit ....
Both using the same battery , CR1220 , but different bulb size ~ the blue one appears brighter and more beautiful xD
I hope i am able to shared this to help you gain knowledge and get some idea to custom or enhance your Gunpla xD
So yeah , to be able to use this custom unit , there is alot of conditions xD
Cost saving and simple.
This LED I'm making is based to the firefly (an insect with a light up buttock xD )
Simply made from LED bulb , Battery , thread and a small piece of pla-plate.
in this case , I made mine using a blue L.E.D i obtained from a old toy , and 1 x CR1220 flat battery. (you can use different size items as you prefer)
The pla-plate acts as a push and pull mechanisms that enable and disable the circuit... when pushed in , it will disconnect the LED leg from the battery that disconnects the circuit , , and when you pull it , the circuit will be connected as the LED leg touches the battery ....
The thread will maintain the position of the LED legs and the battery~
Well , this isn't a pro way to make a L.E.D unit , but you can make this using items you can get from stores at low price ~ PLEASE be very patience when setting the LeD unit xD
heheh so its working , then its ready to be set up in my Gunpla xD
Fabulous ~ xD bright enough to light up the top camera :D
Comparing , the original L.E.D unit and the Firefly unit ....
Both using the same battery , CR1220 , but different bulb size ~ the blue one appears brighter and more beautiful xD
I hope i am able to shared this to help you gain knowledge and get some idea to custom or enhance your Gunpla xD
Tuesday, 21 October 2014
HG Gundam Thunderbolt : MS-06R Zaku II HM Type "Psycho Zaku"
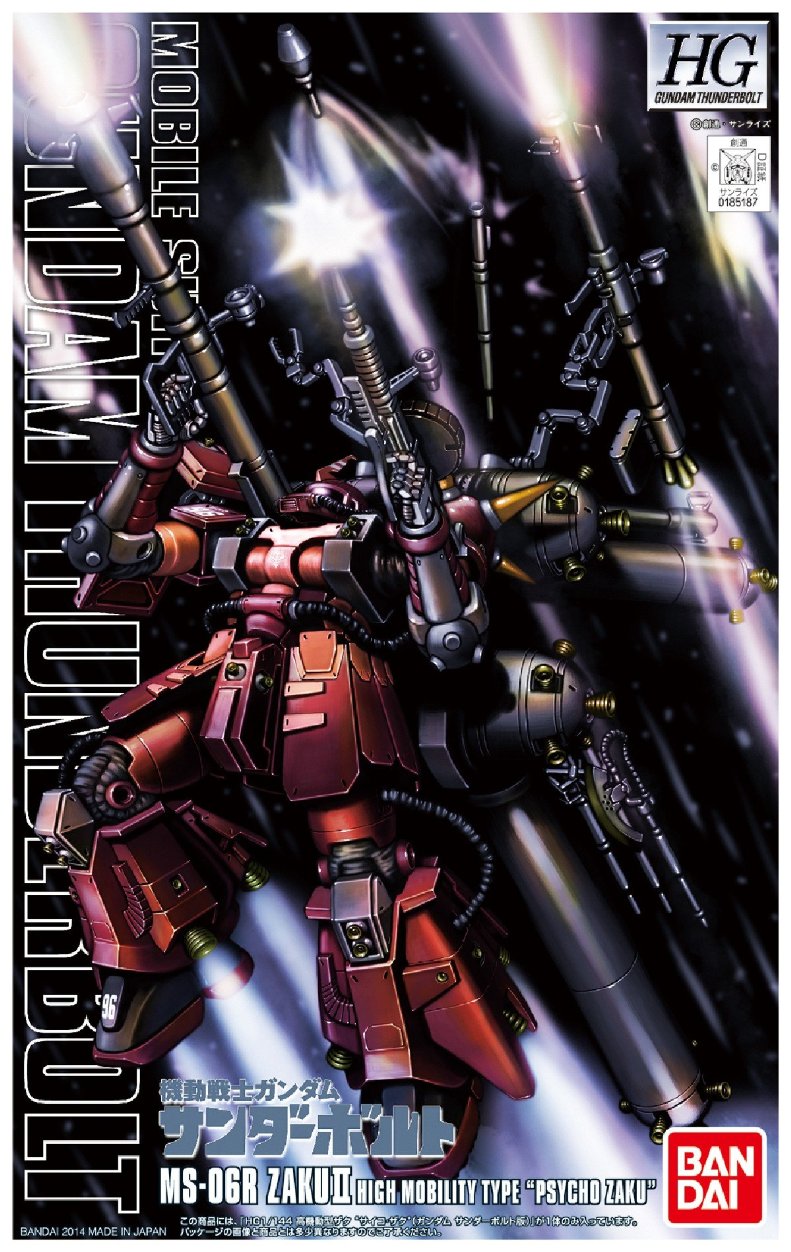
the HG Gundam Thunderbolt : MS - 06R Zaku ii High Mobility Type "Psycho Zaku".
This kit at 2,295 yen , i must say this is the HG that is most worth the price , considering the design , amount of plastic , parts seperation , the hardwork on this piece of Gunpla.
This kit is whole LOT of AWESOMENESS !!
My WIP :::::::
i started off this kit with building the body first.....
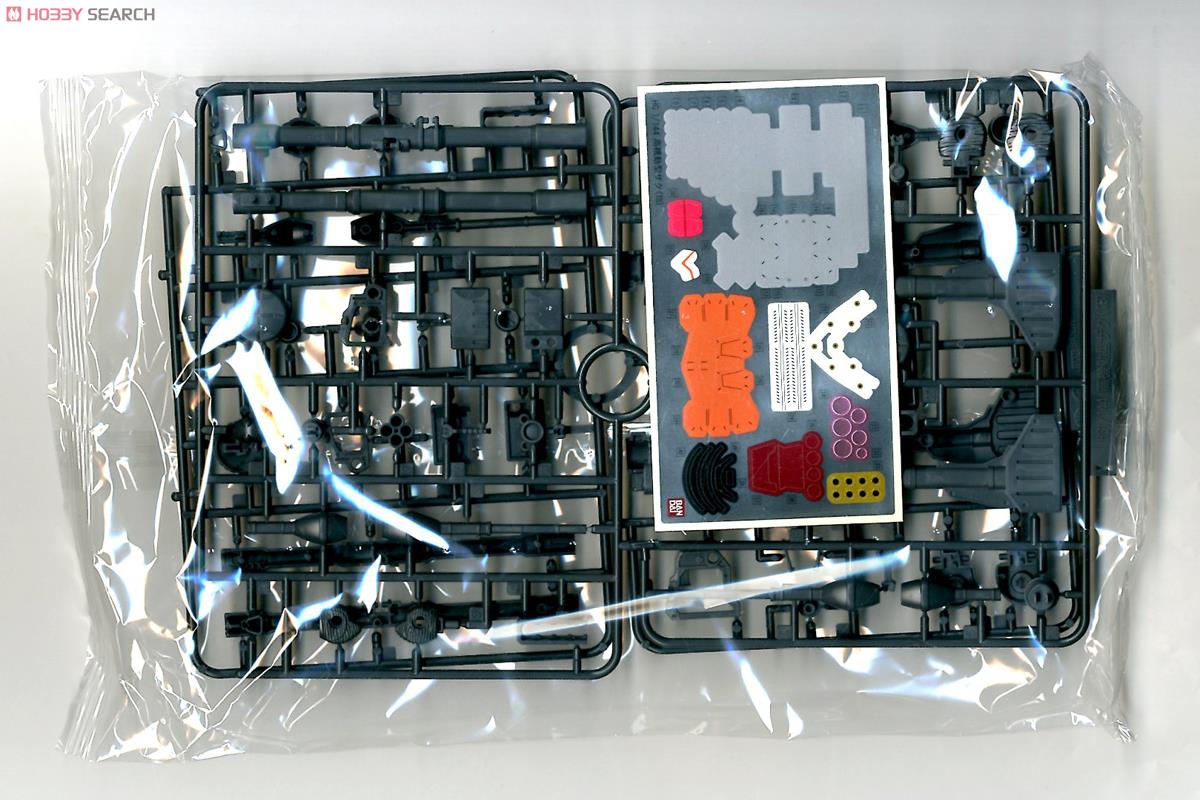
i avoid using the stickers on this kit , so i painted parts where stickers are supposed to be applied on :D
this kit comes with a piece of stickers and a piece of decals.
![]() |
http://www.1999.co.jp/eng/image/10255391n/40/1 |
![]() |
http://www.1999.co.jp/eng/image/10255391n5/40/5 |
Yup , GLOSS RED <3 FABULOUS xD
To be honest that this kit hurts my finger ALOT , due to the amount of small parts in this kit ~
The gold parts are especially the most finger-hurting parts , because they are really really tiny @@
and i got a few cuts on my fingers when im doing nub removal procedures.... T^T
On the skirt armor , i accidentally ruined a hidden part of it ~ so i decide to give some minor "damage" to cover up my mistake xD hahaha
Still look fabulous ay ? xD hahaha
Completed the body together with decals ,,,,,
As for the back , this kit has a amazing full-armor-like back , with extra weapons , weapon armor with two long "tubes" attached on....
loading all the weapons to the back :::::
All loaded ::::::
and you get a fabulous looking back ~
phew FABULOUSSSS !!! xDD
now , if you realize , there are two squarish tabs on the top part of the back pack ..... it actually the "Arms" to fetch the weapon from the back ~ .....
You will be given two modes of these , one is folded into a squarish tab , another one is opened up ~
How i wish that this is articulated , sadly no .... (the only bad thing bout this kit)
As for me i prefer to make use of the "Arms" so i decided to pose mine with the opened "arms"
If you are wondering about the stability of this kit without the stand ....
It will still able to stand straight without the stand , the lower "tube" will act as a support for this kit to stand up straight ~ so worry not :D
Overall , this kit is TOO awesome :D i would recommend this kit to whoever loves full armor kits , ballistic kits , Zaku fans , and those who love red :D xD
EXTRA IMAGE GALLERY ::::::::::::
to make your own GP BASE : click >>> HERE .
Wednesday, 8 October 2014
GUNDAM BUILD FIGHTERS TRY
Subscribe to:
Posts (Atom)